The Add Device wizard in the Bell Smart Home app will walk you through the steps to connect your camera or home automation device to your home network and add the device to your Bell Smart Home service.
To run the Add Device wizard:
- Launch the Bell Smart Home app and log in.
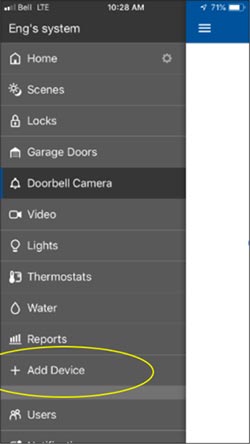
- Touch the menu button on the top-left corner of the screen (3 horizontal lines).
- Select + Add Device and follow the steps.
Note: One of these steps requires you to connect your camera to Wi-Fi. To do so, use the username and password you use to connect to your home Wi-Fi network.
Pre-installation checklist:
1. Wi-Fi requirements
The doorbell camera connects to a 2.4 GHz Wi-Fi connection and requires at least 2 Mbps of consistent upload speeds. For better performance, make sure your router is set to support the 802.11n standard.
2. Power requirements
WARNING: Connecting the doorbell camera to the wrong electrical supply will result in damage to your doorbell camera, which is not covered under the warranty.
It is important for a certified electrician to check that you have a low-voltage 10-36 VAC (10 VA) current coming to your existing doorbell. If you don’t meet this requirement, do not proceed with installation and consult with your electrician on the next steps.
3. Doorbell chime requirements
Examine your doorbell chime to determine if your doorbell chime is mechanical or digital. The doorbell camera does not work with wireless doorbell chimes or intercom systems.
Mechanical doorbell chime
This doorbell chime has two pistons that strike metallic keys to make the doorbell sound. The doorbell camera works with mechanical doorbell chimes without having to make any changes.
Mechanical chime – before installation
![]()
Mechanical chime - with doorbell camera
![]()
Digital doorbell chime
This doorbell chime uses a speaker to play a doorbell sound. If you have a digital doorbell chime, you’ll need an adapter for your doorbell. You can purchase a digital doorbell adapter at an electronics store.
Digital chime – before installation
![]()
Digital chime – with doorbell camera
![]()
Installation guide
ELECTRICAL SHOCK HAZARD
Have a certified electrician confirm that there is 10-36 VAC (10 VA) coming to your existing doorbell. It is important to complete this step. If power reading does not come back as 10–36 VAC (10 VA), then do not proceed with installation and consult with your electrician on the next steps.
If you need to install a transformer, digital doorbell adapter or doorbell chime, we recommend that you use a qualified electrician. Power to doorbell must be turned off for these installations. Do not restore power to your doorbell or transformer until all electrically wiring work has been completed. Restoring power before installation is complete may result in serious electrical shock, injury or death.
Installation tools and equipment
| Included in the box | What you need to provide | Other tools you may need |
|---|---|---|
|
|
|
|
If applicable, please disarm your security system.
Step 1 - Remove existing doorbell button
1. Typically, there are screws holding the existing doorbell to the doorframe that you’ll have to unscrew to gain access to wiring.
IMPORTANT: As outlined above under ELECTRIC SHOCK HAZARD, confirm that there is 10-36 VAC (10 VA) coming from your doorbell’s transformer. It is important to complete this step before proceeding. If power reading does not come back as 10-36 VAC (10 VA) then remount old doorbell and consult with a certified electrician.
2. Remove the two power wires from the existing doorbell button.
3. CAUTION: Cover the exposed ends of the wires with electrical tape to prevent them from touching.
4. Take care to prevent the existing doorbell wires from slipping into the wall.
Step 2 - Attach the doorbell camera mounting plate to the wall
1. Feed the existing doorbell wires through the hole in the centre of the supplied doorframe mounting plate.
2. Affix the mounting plate firmly to the wall by driving the provided wall screws through the top and bottom holes in the bracket.
Failure to make the bracket flush on the wall could cause a poor power connection between the bracket and the doorbell camera.
Step 3 - Connect power wires to the mounting bracket
1. Loosen the power terminal screws on the mounting bracket and insert the wires beneath the screws. Do not short (touch together) the wires during this process.
2. Tighten the screws. The wires must be of approximately equal thickness, and the screws should be tightened approximately the same amount so that the screw heads are flush.
Step 4- Attach the doorbell camera to the mounting bracket
1. Slide the top of the doorbell camera down on to the mounting bracket and push the front of the doorbell camera toward the wall.
2. Tighten the set screw located on the bottom of the camera, being careful not to damage it (do not use power tools).
After you have restored power to the doorbell camera, the camera’s LED should begin to illuminate. Please allow 10 minutes for your doorbell camera to charge before proceeding to synchronization.
How to synchronize the doorbell camera to your Wi-Fi and Bell Smart Home service.
The doorbell camera is ready to synchronize when the LED light alternates between red and green. Press the doorbell button on the doorbell camera for 60 seconds until the light flashes red and green. Release the button.
This LED pattern indicates that the doorbell camera is in ready to synchronize. During the syncing process, you’ll connect to a wireless network created by the doorbell camera when instructed by the app. The app will configure the doorbell camera.
1. Launch the Bell Smart Home app and log in
2. Touch the menu button on the top left of the screen (3 horizontal lines) and select Add Device-> Doorbell Camera
3. Select your doorbell model to begin the installation.
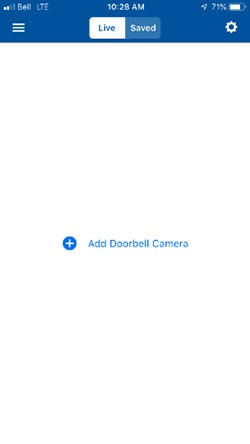
Note: If a doorbell camera is already installed, touch Add Another Camera.
4. On the next pages, you’ll be asked to confirm that the doorbell camera has been mounted and the LED alternates between red and green. Touch Next.
5. On the Device Name page, enter a name for the doorbell camera and Touch Next.
The phone begins to search for the doorbell camera.
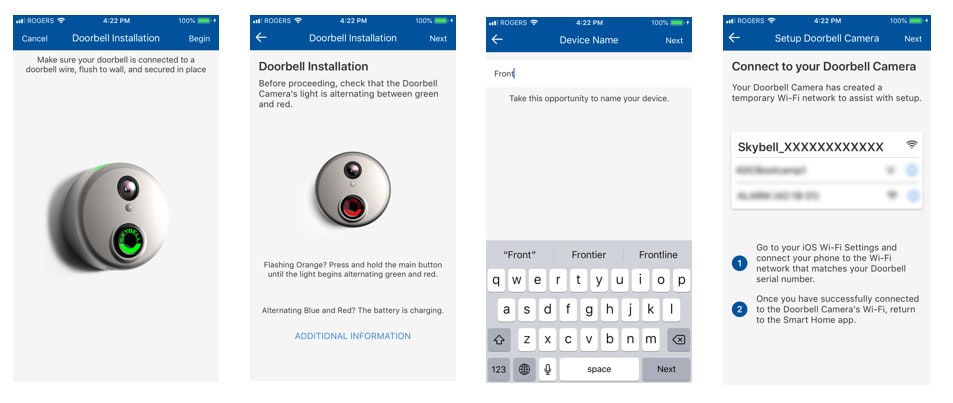
6. When instructed, connect to the doorbell camera’s temporary Wi-Fi network. The network is called Skybell_123456789 or SkybellHD_123456789, where 123456789 corresponds to the doorbell camera's serial number.
Note: If you do not see the Skybell network, verify that the doorbell camera is blinking green and red.
This is a temporary Wi-Fi network for the purpose of the installation process only. You may get a message indicating that there is no Wi-Fi but this is expected. Dismiss the message and continue to stay connected to the doorbell camera's temporary Wi-Fi during the installation process.
Remain within six feet of the doorbell camera throughout the entire enrollment process to ensure the mobile device and the doorbell camera stays connected.
7. If you’re using an iPhone or iPad, you’ll need to follow these extra steps:
a. Close the Bell Smart Home app
b. Go to your device’s Settings.
c. Touch Wi-Fi.
d. Touch to select the Skybell network.
e. Once connected, go back to the Bell Smart Home app to complete the installation.
8. Once the Bell Smart Home app finds the new doorbell camera, select the Wi-Fi network that you want to connect the doorbell to.
9. Very carefully enter your Wi-Fi password and touch Next.
10. Once the doorbell camera's configuration is complete, a Success message appears on the screen. Touch Next.
11. Touch Done. Your doorbell is ready to use.

Pre-installation checklist:
| Included in the box | What you need to provide |
|---|---|
|
|
|
Follow these steps to install your camera.
If applicable, please disarm your security system.
Step 1 - Connect your camera
To ensure a sufficient Wi-Fi signal, plug the camera in a power outlet near its final location before mounting it.
The Add Device wizard in the Bell Smart Home app will walk you through the steps to connect your camera or home automation device to your home network and add the device to your Bell Smart Home service.
To run the Add Device wizard:
- Launch the Bell Smart Home app and log in.
- Touch the menu button on the top-left corner of the screen (3 horizontal lines).
- Select + Add Device and follow the steps.
Note: One of these steps requires you to connect your camera to Wi-Fi. To do so, use the username and password you use to connect to your home Wi-Fi network.
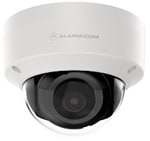
Step 2 – Mount your camera
Desktop installation
easy. Simply position the camera on a flat surface using the built-in stand.
Wall-mount installation
If you prefer to mount the camera on a wall, follow these instructions:
Note: Before you begin, ensure there is no electrical wiring or cables in the areas where you plan to drill or screw.
- Use the wall-mounting plate provided to mark the holes for the screws and wall anchors where you want to mount the camera.
- Drill pilot holes for the wall anchors with a 7/32 inch drill bit.
- Insert wall anchors by tapping them into the pilot holes.
- Attach the mounting plate to the wall using the provided screws.
- Connect the power cable to the camera and power outlet.
- Slide the base of the camera onto the mounting plate and turn it clockwise approximately 10 degrees to secure it to the mounting plate.
- Open your Bell Smart Home app, scroll down to the camera and touch the symbol to check that the camera is in working order.
- Tilt and turn the camera to aim it at the desired area.
Pre-installation checklist
| Included in the box | What you need to provide |
|---|---|
|
|
|
Follow these steps to install your camera.
If applicable, please disarm your security system.
Step 1 - Connect your camera
To ensure a sufficient Wi-Fi signal, plug the camera in a power outlet near its final location before mounting it.
The Add Device wizard in the Bell Smart Home app will walk you through the steps to connect your camera or home automation device to your home network and add the device to your Bell Smart Home service.
To run the Add Device wizard:
- Launch the Bell Smart Home app and log in.
- Touch the menu button on the top-left corner of the screen (3 horizontal lines).
- Select + Add Device and follow the steps.
Note: One of these steps requires you to connect your camera to Wi-Fi. To do so, use the username and password you use to connect to your home Wi-Fi network.
Step 2 – Mount your camera
Before you start
- Determine the path that the power cable will take from the camera location (once mounted) to where it will be plugged in. This tells you how long your power cable needs to be and if drilling through walls or ceilings is required.
- Ensure there is no electrical wiring or cables in the areas where you plan to drill or screw.
Typical installation order:
- Use the wall-mounting plate provided to mark the holes for the screws and wall anchors where you want to mount the camera.
- Drill the holes.
- To drill pilot holes for wall anchors, use a 7/32 inch drill bit.
- To make a hole for the power cable, use a 3/8 inch drill bit.
- Insert wall anchors by tapping them into the pilot hole.
- Attach the mounting plate to the wall using the provided screws.
- Attach the camera to mounting plate and secure it with the provided base secure screw.
- Connect the power cable to the camera and plug in the AC adapter to a power outlet.
- Open your Bell Smart Home app, scroll down to the camera and touch the symbol to check that the camera is in working order.
- Tilt and turn the camera to aim it at the desired area.
Pre-installation checklist
| Included in the box | What you need to provide |
|---|---|
|
|
|
Follow these steps to install your camera.
If applicable, please disarm your security system.
Step 1 - Connect your camera
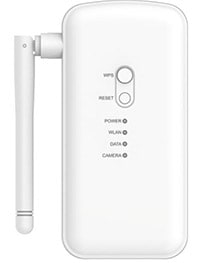
- Using an Ethernet cable, connect your camera to the port marked “Camera” on the ADC-W100 wireless bridge.
- Plug the wireless bridge into an electrical outlet that is within close range of your Wi-Fi network or router.
- Confirm that the power indicator on front of the PoE device is solid green.
- Press the WPS button for about three seconds and release it when the WLAN indicator begins to flash red.
- Press the WPS button on your modem/router for four to five seconds.
- Allow a few minutes for the PoE adapter/camera to connect with your modem. The WLAN indicator flashes green when the connection is complete. When no data is being sent over Wi-Fi, the light goes to a solid green to indicate it’s connected to Wi-Fi.
- Run the Add Device wizard in your Bell Smart Home app to connect your camera to your Wi-Fi and Bell Smart Home service:
- Launch the Bell Smart Home app and log in.
- Touch the menu button on the top-left corner of the screen (3 horizontal lines).
- Select + Add Device and follow the steps.
Note: One of these steps requires you to connect your camera to Wi-Fi. To do so, use the username and password you use to connect to your home Wi-Fi network.
Step 2 – Mount your camera
Before you start
- Ensure that the Wi-Fi signal is strong enough:
- Move the camera and wireless bridge to the area where you’ll be mounting the camera.
- Power up the camera.
- In the Bell Smart Home app, confirm that the camera is working properly.
- Determine the path that the Ethernet cable take from the camera location (once mounted) to where the wireless bridge will be plugged in. This tells you how long your Ethernet cable needs to be and if drilling through walls or ceilings is required.
- Ensure there is no electrical wiring or cables in the areas where you plan to drill or screw.
Typical installation order:
- Mark drilling locations.
- Use the drill template provided to mark the holes for the screws and wall anchors where you want to mount the camera.
- Mark the holes for the Ethernet cable.
- Drill the holes.
- To drill pilot holes for wall anchors, use a 7/32 inch drill bit.
- To make holes for the Ethernet cable, use a 1/2 inch drill bit.
- Insert wall anchors by tapping them into the pilot hole.
- Feed the Ethernet cable through the wall so that part of the cable is on either side of the wall.
- Assemble the cable protection kit.
- Mount the camera using provided screws.
- Feed any excess Ethernet cable back into the wall. To protect from weather, apply caulking or silicone sealant around the Ethernet cable where it enters the wall.
- Connect the other end of the Ethernet cable to the port marked “Camera” on the ADC-W100 wireless bridge.
- Open your Bell Smart Home app, scroll down to the camera and touch the symbol to check that the camera is in working order.
- Tilt and turn the camera to aim it at the desired area.
Pre-installation checklist
| Included in the box | What you need to provide |
|---|---|
|
|
|
Follow these steps to install your camera.
If applicable, please disarm your security system.
Step 1 - Connect your camera
- Using an Ethernet cable, connect your camera to the port marked “Camera” on the ADC-W100 wireless bridge.
- Plug the wireless bridge into an electrical outlet that is within close range of your Wi-Fi network/router.
- Confirm that the power indicator on front of the PoE device is solid green.
- Press the WPS button for about three seconds and release it when the WLAN indicator begins to flash red.
- Press the WPS button on your modem/router for four to five seconds.
- Allow a few minutes for the PoE adapter/camera to connect with your modem. The WLAN indicator flashes green when the connection is complete. When no data is being sent over Wi-Fi, the light goes to a solid green to indicate it’s connected to Wi-Fi.
- Run the Add Device wizard in your Bell Smart Home app to connect your camera to your Wi-Fi and Bell Smart Home service:
- Launch the Bell Smart Home app and log in.
- Touch the menu button on the top-left corner of the screen (3 horizontal lines).
- Select + Add Device and follow the steps.
Note: One of these steps requires you to connect your camera to Wi-Fi. To do so, use the username and password you use to connect to your home Wi-Fi network.
Step 2 – Mount your camera
Before you start
- Ensure that the Wi-Fi signal is strong enough:
- Move the camera and wireless bridge to the area where you’ll be mounting the camera.
- Power up the camera.
- In the Bell Smart Home app, confirm that the camera is working properly.
- Determine the path that the Ethernet cable take from the camera location (once mounted) to where the wireless bridge will be plugged in. This tells you how long your Ethernet cable needs to be and if drilling through walls or ceilings is required.
- Ensure there is no electrical wiring or cables in the areas where you plan to drill or screw.
Typical installation order:
- Mark drilling locations.
- Use the drill template provided to mark the holes for the screws and wall anchors where you want to mount the camera.
- Mark the holes for the Ethernet cable.
- Drill the holes.
- To drill pilot holes for wall anchors, use a 7/32 inch drill bit.
- To make holes for the Ethernet cable, use a 1/2 inch drill bit.
- Insert wall anchors by tapping them into the pilot hole.
- Feed the Ethernet cable through the wall so that part of the cable is on either side of the wall.
- Assemble the cable protection kit.
- Mount the camera using provided screws.
- Feed any excess Ethernet cable back into the wall. To protect from weather, apply caulking or silicone sealant around the Ethernet cable where it enters the wall.
- Connect the other end of the Ethernet cable to the port marked “Camera” on the ADC-W100 wireless bridge.
- Open your Bell Smart Home app, scroll down to the camera and touch the symbol to check that the camera is in working order.
- Tilt and turn the camera to aim it at the desired area.
- Reattach the camera cover using the three screws you set aside.
To protect from weather, apply caulking or silicone sealant where the back of the camera touches the mounting surface.