To start using Smart Video, follow the steps below to set up Video Analytics. It is possible to create up to three Video Analytics rules on the same camera.
Add/Modify a Video Analytics rule
Using the website
- Log in to the website.
- Click
 Video.
 - Click Recording Rules.
- Click + Add New Rule or select an existing rule to edit.
- Select Video Analytics (only required when adding a new rule).
Using the app
- Log in to the Bell Smart Home app.
- Touch Video.
- Touch
 .
. - Touch Recording Rules.
- Touch + Add New Rule.
- Touch Video Analytics.
Select the rule type
- Select the desired camera. If the camera needs to be calibrated, you’ll be directed to the calibration page.
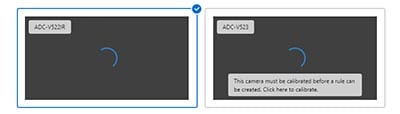
For more information see article below, Calibrating the camera.
- In Select Type, select the rule type:
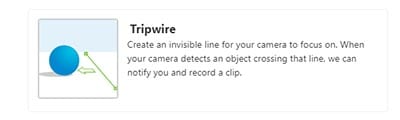
- Click Tripwire when a target is likely to cross through the camera’s field of view or when objects enter or exit an area (e.g., a car pulling into or backing out of a driveway).
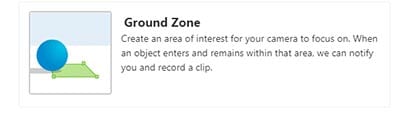
- Click Ground Zone when a target is likely to linger in the camera’s field of view (e.g., a person delivering a package on the front porch).
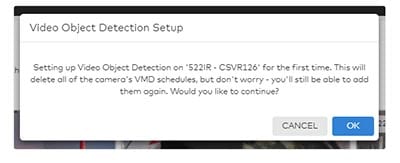
- If the camera already has Video Motion Detection (VMD) recording rules, they must be deleted before setting up a Video Analytics rule. When prompted with the following warning, click OK to continue.
If the error below appears, try the following steps.
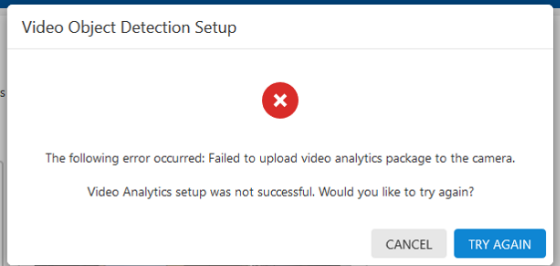
- Click the Try Again button.
- If Video Analytics still doesn’t load, reboot your camera:
- Locate the power source to the camera and unplug it.
- Wait 15 seconds and then plug the camera back into the power source.
- Wait for camera LED light to turn solid green. Once it’s green, try setting up Video Analytics again. If issues persist, please call 1 844 474-2023 for technical support.
- Click Next.
Select the camera scene
- In Scenery, select Indoors or Outdoors based on where the camera is installed. The camera should be marked outdoors if it will be exposed to rain, snow, spider webs or moving trees, and set to indoors if in a controlled outdoor environment (e.g., a screened-in porch).
Note : This selection must be the same across all recording rules associated with a specific camera.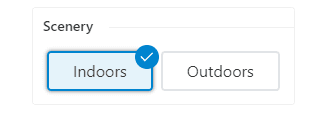
- If the Minimum Object Detection Size setting appears, use the slider to adjust how small an object can be and still trigger a recording. It is recommended to keep this at its suggested value upon initial rule creation. Very Large captures the fewestrecordings with only the largest objects, and Very Small captures the most recordings including large and small objects.
Note : If the Minimum Object Detection Size setting doesn’t appear, your video device uses a different calibration process.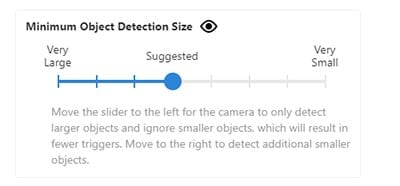
- Click Next.
Configure a ground zone rule
Skip this section if you chose the tripwire rule type.
- In the Rule Name field, enter a name for the recording rule.
- Click and drag the corners of the shape to cover only the ground where the target’s feet will be. To clear the current area of interest and restart, click Clear Ground Zone.
- Click and hold inside the shape to move the shape itself.
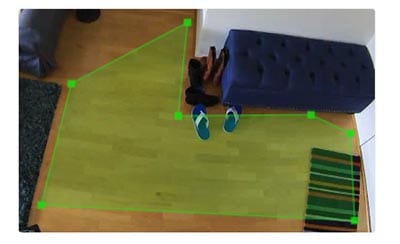
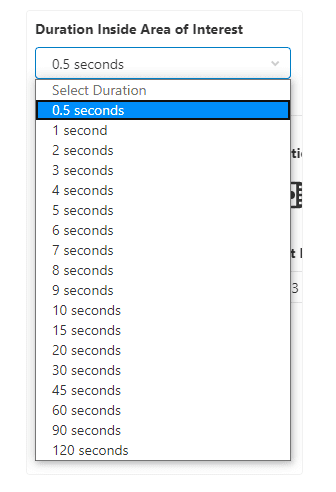
- Using the Duration Inside Area of Interest dropdown menu, select the desired time an object needs to stay inside the ground zone to trigger a recording.
Configure a tripwire rule
Skip this section if you chose the ground zone rule type.
- In the Rule Name field, enter a name for the recording rule.
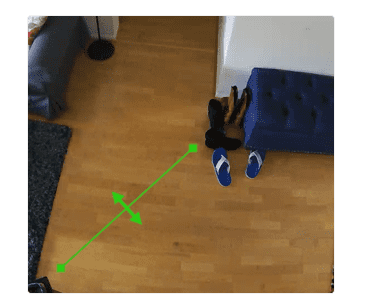
- Click and drag the tripwire to cover only the ground where the target's feet cross. The arrow determines which direction the object must be moving to trigger a recording. To clear the current tripwire and restart, click Clear Tripwire.
- Customize the direction of movement to be recorded:
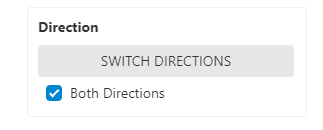
- In Direction, click Switch directions to switch the direction of the movement to capture.
- Select Both Directions to record any time an object crosses the tripwire, no matter which direction it is moving in.
Configuring schedules, exceptions and notifications for the rule
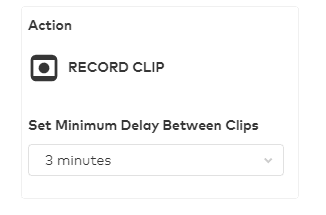
- Using the Set Minimum Delay Between Clips dropdown menu, select the desired timeframe. This setting determines how long the camera must wait after recording a clip to trigger another recording.
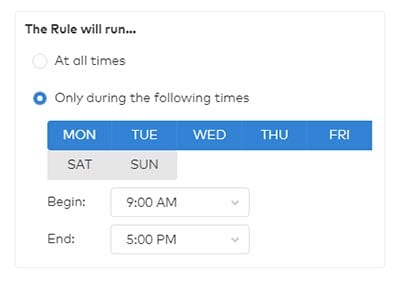
- In The Rule will run…, select At all times or Only during the following times.
- If Only during the following times is selected:
a. Select the days of the week to record on.
b. Using the Begin dropdown menu, select the time for the recording rule to start.
c. Using the End dropdown menu, select the time for the recording rule to stop.
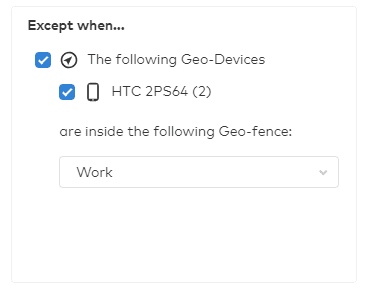
- In Except when…, select any exceptions that turn the rule off regardless of the schedule. Depending on the equipment, options may include:
- Panel is armed away
- Panel is armed stay
- Geo-device is inside a specified geo-fence.
- In Send notification for clips containing…, select the types of clips that you want to be notified about. The camera records and uploads all motion it detects but it only sends you a notification based on the notification options you selected.
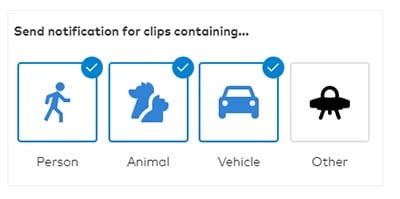
Note : In the Other category, you’ll find clips where the camera detected an object but was unable to determine which type it is.
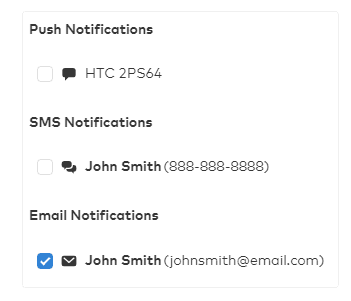
- Select the desired notification recipients. It is recommended to use push notifications to a phone using the dropdown option to attach a thumbnail.
Video Analytics can be configured to detect when an object lingers in a specific area or when an object passes through a specific point.
When to use a ground zone rule
Use a ground zone rule when the object to be recorded lingers in a specific area for too long. Verify that the ground zone is fitted to the ground or floor where the object's feet will be.
When to use a tripwire rule
Use a tripwire rule when the object to be recorded passes through a specific point. Verify that the tripwire is placed where the object's feet or wheels will cross.
Best practices
- Avoid intersecting tripwires or overlapping ground zones with objects that are prone to movements, such as trees, bushes or other objects that move in the wind.
- Only draw the rule where the feet or wheels of an object should cross.
- Do not increase the size of the loiter zone or tripwire to cover the whole of the target.
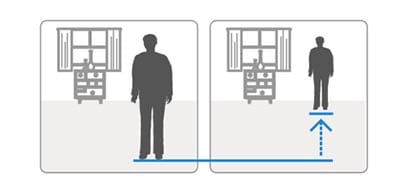
- Do not include furniture, walls, trees, or other structures in the rule/selection.
- After observing what the rule detects over a few days, consider adjusting either the Minimum Object Detection Size slider or recalibrating the camera. When adjusting the Minimum Object Detection Size slider:
- Increasing the minimum object size can reduce false detections.
- Decreasing the minimum object size can detect smaller targets.
When adjusting the Minimum Object Detection Size slider:
View video clips
Using the website
- Log in to the website.
- Click Video.
- Click Saved Video Clips.
- Only clips with a valid person, vehicle, or animal classification appear by default.
To view clips classified as Other:a. Using the dropdown menu next to the date pickers, select Other. To only show video clips classified as Other, deselect all other items in the dropdown menu.
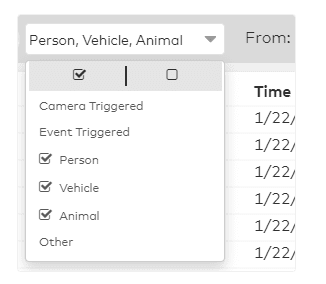
b. Click Search.
- To play a clip:
- In Gallery View, hover over the desired clip, then click
 Play.
Play. - In List View, click the desired clip's Clip Description.
- Note: Clips that include a pre-trigger recording start playing the moment themotion is detected instead of at the beginning of the clip.
- In Gallery View, hover over the desired clip, then click
- Log in to the app.
- Touch
 .
. - Touch Video.
- Touch Saved.
- Only clips with a valid person, vehicle or animal classification appear here by default.
To view clips classified as Other:a. Touch
 .
.b. In Object Detection, touch Other. To only show clips classified as Other, deselect all other items in Clip Trigger.
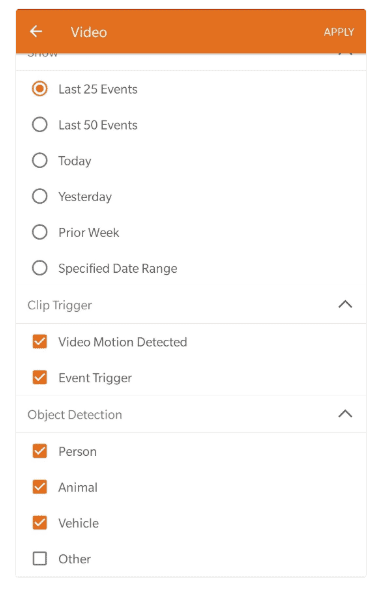
c. Touch Apply.
- Touch
 .
.
Note: Clips that include pre-trigger recording start playing the moment the motion is detected instead of at the beginning of the clip.
Calibration best practices
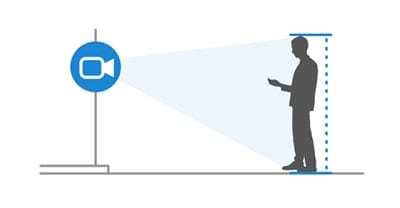
Verify that the person's entire body is in the field of view for each photo.
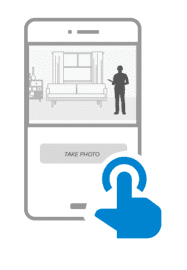
Verify that the person's entire body is in the field of view for each photo.
Calibrate the camera
Using the website
- Log in to the website.
- Click Video.
- Click Recording Rules.
- Click + Add New Rule.
- Click Video Analytics.
- Select the video device to be calibrated.
Note : The camera's existing Video Motion Detection (VMD) rules will be removed, but they can be added back later. Click OK to delete the VMD rules and continue with calibration. - After the camera completes the Video Analytics setup, click Close.
- Select the video device to be calibrated.
- Click Continue.
- Verify the person is in the camera's field of view, then click Take Photo.
- Click Next.
- Repeat the previous two steps for each photo having the person move a few steps further from the camera each time.
- After five photos are captured, click Submit.
- Once the calibration is complete, click Done. The camera is now ready for a Video Analytics rule.
- Log in to the app.
- Touch .
- Touch Video.
- Touch .
- Touch Recording Rules.
- Touch + Add New Rule.
- Touch Video Analytics.
- Select the video device to be calibrated.
Note : The camera's existing Video Motion Detection (VMD) rules will be removed, but they can be added back later. Touch OK to delete the VMD rules and continue with calibration. - After the camera completes the Video Analytics setup, touch Close.
- Select the video device to be calibrated.
- Touch Continue.
- Verify the person is in the camera's field of view, then touch Take Photo.
- Touch Next.
- Repeat the previous two steps for each photo having the person move a few steps further from the camera each time.
- After five photos are captured, touch Submit.
- Once the calibration is complete, touch Done. The camera is now ready for a Video Analytics rule.