This Do It Yourself Guide to Inside Wiring can assist you whether you decide to perform inside wiring activities yourself, hire an external contractor or use the services of a Bell Aliant technician.
What you need to know before you start:
Use of this guide is at your own risk. Although the voltage on active telephone wiring is typically very small it can be hazardous to some individuals and materials. In addition, telephone wiring can conduct dangerous electrical shocks if it comes into contact with power wires, caution should be used when working near or around electrical wiring. Bell Aliant and affiliates have no responsibility for any personal injury or property damage which may result from your installation or attempted installation of inside wiring as discussed in this guide. Bell Aliant and it affiliates specifically disclaim any liability for such injury or damage. By proceeding with this installation, you assume all risk of personal injury or property damage.
If you have a party line or your service terminates on a hardwired set, Bell Aliant will continue to repair inside wiring as part of your basic service, at no additional charge.
The Facts:
Bell Aliant installs and maintains the outside telephone wiring leading up to your residence or place of business up to either a telephone protector box or a demarcation jack (NID). This is called the demarcation point. This point separates the wiring inside your dwelling from the Bell Aliant network.
The installation and maintenance of wiring and jacks inside your premises is your responsibility. Bell Aliant will continue to maintain the wiring on the Bell Aliant network side of the telephone protector box or demarcation jack (NID).
A NID (Network Interface Device) is a compact grey box and serves as the point of entry where Bell Aliant’s network connects to the customers premise. Most times the NID is located inside the house, but some are outside. If a NID is not present, one will be installed at no additional cost to you. (See figure below):
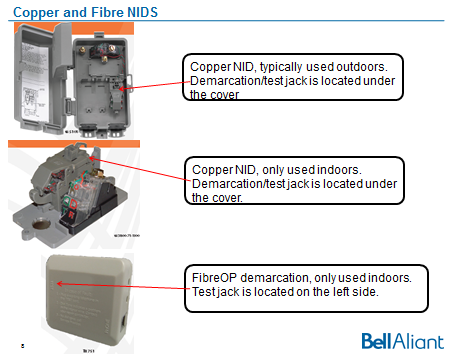
Locating the NID/Demarcation point
The best place to begin is inside the house near the electrical panel box. The placement of NIDs has always depended on the circumstances during an installation; however the preference has always been to place it inside the residence close to the panel.
If the NID is not located around the panel box, check other areas within the house where infrastructure for utility services might be located. If modem/gateway is not at panel box, look for that. Look where any security panel for home security may be located. If the NID is still not found, it could mean it is located outside the house.
Once the NID is found it must be opened to locate the demarcation jack. This jack can be used to determine if your service trouble is on the Bell Aliant network or inside your home.
Testing the NID
All outside casings should snap open to reveal the inside of the NID. No screwdriver is required. The diagram below is the most common NID installed in homes.
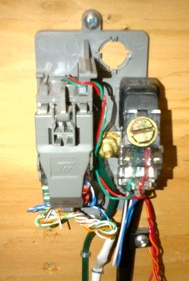
When the NID is first opened, the outlet in which the phone is connected will not be immediately visible. There is a lid type attachment that needs to be lifted upward to reveal the outlet. (See figure below):
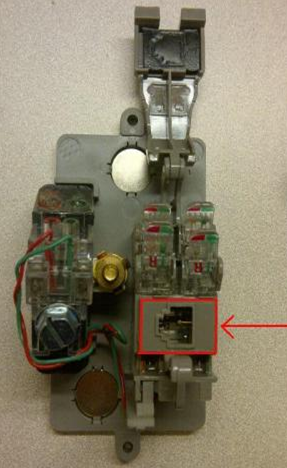
The area marked in red in the diagram above is where you would plug in a landline phone. If you hear a dial tone when a phone is connected into this outlet, the trouble has been isolated to somewhere within your house; therefore you are responsible to have the problem fixed (it is not the responsibility of Bell Aliant to repair).
If you choose to have Bell Aliant repair the issue a repair fee will apply. The NID/Demarcation jack is the responsibility of Bell Aliant to install and maintain.
Troubleshooting:
- If Bell Aliant has not installed a NID/Demarcation jack at your premises and you have trouble:
- Make sure that the problem is not due to a defective telephone set. Try another telephone set to double check.
- Call Bell Aliant Repair Service at 611. If the problem is with the Bell Aliant network there will be no charge for the repair.
- If Bell Aliant has NID/Demarcation jack at your premises:
- Locate the NID.
- Plug a telephone that you know is working properly into the demarcation jack.
If you do not hear a clear dial tone at this point, more then likely the trouble exists in the Bell Aliant network. Call Bell Aliant Repair Service and if the technician confirms the trouble is not inside your home there will be no charge for the repair.
If you hear a clear dial tone when your telephone set is plugged into the demarcation jack, the trouble is isolated inside your home (inside wiring, jack/s or other telephone set). In this case, you have 3 options:
- You can call Bell Aliant Repair Service to place a repair order. Bell Aliant will only charge for the repair upon verification the issue resides inside your home. If a NID is not present, one will be installed at no cost to you.
- Call a contractor. Contractors are listed in your Yellow Pages and telephone directory.
- Repair the trouble yourself.
Repairing inside wire yourself:
- Ensure that your inside wire is connected properly at the demarcation point. You can determine a lot about the trouble by listening to sounds on your telephone line:Static: Wires could be wet or pierced. Wires could be loose at a connecting point. Carefully check all wires and connections.
- If Buzzing: A wire may have come into contact with metal, other than the connection terminals. Is any exposed copper wire touching the box or other metal around the jack? Check that colours have been matched correctly.
- If there is Dead Air: Wires may be crossed. Is there a contact between any exposed copper from wires of different colours (red crossed with green if two pair wire is being used; or blue crossed with white if three pair wire is being used)?
- Check that all connections have been made properly. Are all the coloured wires connected to the right terminals? Is the exposed copper wiring making a solid contact with the right terminals?
- Check the wire. Is it broken or split? Is it pierced by a staple, nail, screw or other object? If it is, replace the entire section of wire from end to end.
- Check that the pins or connecting terminals inside the jacks are not touching each other and that a jack itself is not damaged.
To isolate a trouble in your inside wire:
- Locate your wire distribution device (connector block) at your demarcation point
- Disconnect one pair of wires from the distribution device
- Check to see if your service has been restored at other jack locations in your home
- Continue disconnecting wire pairs, one pair at a time, to determine which wire is the cause of the trouble
- Once you have isolated the problem circuit, it is suggested that you replace the entire section of wire that is defective or the jack if it is causing the problem
Note: If you are unable to repair or isolate an inside wire trouble yourself, Bell Aliant Repair Service or an independent contractor can determine the problem and make repairs. Charges apply.
Important Notes when Repairing Wiring:
- Telephone wiring and jacks must be approved by the Canadian Standards Association. For safety and reliability, look for the CSA symbol on any telephone wire or jacks you use.
- The voltage on active telephone wiring is relatively low and is normally not hazardous. However, telephone wiring can conduct dangerous electrical shocks if it comes into contact with energized electrical wires. Therefore, CAUTION should be used when working near or around electrical wiring, or when working on telephone wiring that may be in contact with live electrical wires.
- Bell Aliant is not responsible for any material or personal damages suffered in relation to work performed by yourself or a contractor on inside wiring or jacks inside your home or premises.
Planning a Wiring Installation:
Consider the following when planning your inside wire installation:
- Determine your telecommunications needs for now and for the future. This will affect your choice of wire (either Cat 1, Cat 2, Cat 3, Cat 4, or Cat 5).
- Two pair wire is the standard wire used by Bell Aliant for single line residential installations and is the minimum requirement. Two pairs of wire means that you can easily add an additional telephone service (a separate number) in the future. If you already have two telephone services, select a three pair wire.
- If you are interested in wiring for high speed internet services, see also the discussion on Wiring for High Speed Services.
- Decide where you want to install jacks to plug in telephone sets or other telecommunications equipment, such as a computer modem or a fax machine.
- Consider that each location should be:
- Easily accessible
- Protected from possible damage by normal activities or furniture
- Free from dampness (basement floors, exterior walls) or extreme heat
- Determine the safest and easiest route to run the telephone wiring from the demarcation point to the locations you have selected.
- The following tools are recommended:
- Standard slot screwdriver
- Small Robertson screwdriver
- Needle nose pliers.
- Wire cutting/stripping tool
- Stapler (T 18 recommended)
- You may also need: inside wiring (either Cat 1, Cat 2, Cat 3, Cat 4, or Cat 5); various jacks including: baseboard mounted, flush wall mounted; wire bridging devices (connector blocks); clips to hold the wire in place. These items can be purchased at hardware, electronics or home supply stores.
Wiring Methods:
Concealed wiring tips:
- Use three pair wire for concealed installation. This will make it easier to connect additional telephone services to your home or business in the future.
- Use standard flush mounted baseboard or wall jacks, since they fit a standard electrical outlet box
- Concealed wiring should be installed prior to the walls being covered by insulation and drywall
- Install standard outlet boxes to hold the jacks. Attach these boxes securely to a stud inside the wall at the same level as an electrical outlet or light switch (for wall mounted phones).
- Plan your wiring route to avoid possible damage from future construction, rubbing, overheating, dampness or contact with power wires.
- Start a new wiring run for each jack location.
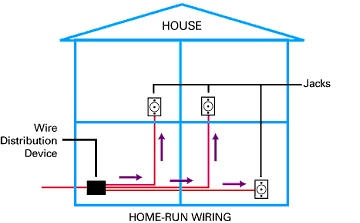
- Every run of wire should start at the demarcation point or, if telephone service has never been installed at your location, at a point close to the main electrical panel. A customer distribution device, or connector block, should be installed at this location.
- Leave approximately 1 metre (3 feet) of wire hanging at the demarcation point. You will make the connections later.
- Run the wire through holes drilled in wall studs and floor joists to reach each location where you plan to install a jack.
- At each jack location, leave approximately 30 cm (12 inches) of wire coiled up inside the electrical box.
- Repeat steps 4 through 8 for each jack location.
Visible wiring tips:
Two pair wire is normally used for visible installations, since it is easier to secure and looks better. Use standard baseboard jacks, since they can be secured easily to any baseboard and are slightly smaller than a flush mounted jack.
- Start at the point where you intend to install a telephone jack
- Leave at least 30 cm (12 inches) of extra wire at the planned location of the jack
- Leave at least 1 m (3 feet) of extra wire at the demarcation point.
- Fasten the wire to the baseboard and moldings using a staple gun (Bell Aliant recommends T 18 staples to avoid damage when using 2 pair wire) or a wire clip every 30 cm (12 inches). Pull the wire straight (but do not stretch it) before installing each staple or clip.
- Since the wire is visible, you may not wish to install individual runs of wire from each jack to the demarcation point. An option is to run wire from a selected jack location to another jack or to a conveniently located wire bridging device (connector block). This method is referred to as a continuous loop (see figure below).
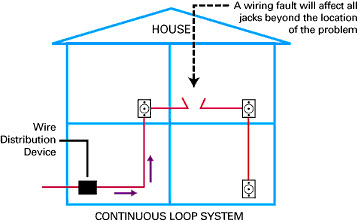
- Bell Aliant only recommends continuous loop installs in cases where visible wiring is required. In all other cases, individual runs to each jack from the demarcation are recommended. This method simplifies repairs if there is a problem and permits greater flexibility if you decide in the future to change the location or telephone number working on a jack (see figure below).
General wiring tips:
- Be careful not to drive staples or clips through the wire. If this occurs, discard the entire section of wire and start again.
- Do not run wire along the floor or under carpets. Normal activity such as walking can damage the wire and cause it to break.
- Do not run wire inside or near heating ducts or vents. Heat can cause wire to become brittle and break.
- Avoid installing wiring in damp or wet areas such as bathrooms, along basement floors and outside walls.
- Keep wire at least 15 cm (5 inches) from electrical wires, fixtures and lights. Electrical circuits can cause noisy interference on your telephone line.
- Do not wrap wire around nails, hooks or other sharp objects. This can cause wear on the wire over time.
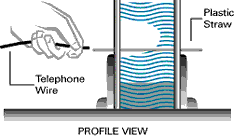
- Avoid running wire around door jams or through windows. Drill a hole in the wall near the floor and pass the wire through the wall or doorway (see figure below).
Connecting the wires:
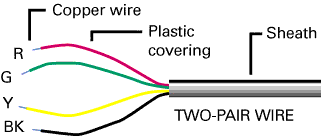
CSA approved telephone wire is colour coded to help make the proper connections:
- Using a wire stripping tool, remove about 10 cm (4 inches) of the outside plastic sheath (usually beige or grey) that bundles the wires together. Be careful not to nick insulation or cut the wires beneath the sheath.
- Using a wire stripping tool, remove about 3 centimeters (about 1 inch) of the plastic insulation from each of the coloured wires to expose the copper as shown in the diagram (see figure below).
- Fasten the jack casing securely to the wall or baseboard using the appropriate metal or wood screws. Pull the wire through the opening in the jack casing (see figure below).
- Two pair wire is colour coded: red/green, yellow/black.
- Three pair wire is colour coded: blue/white, white/orange, white/green
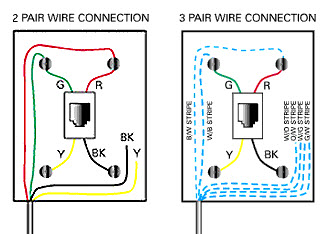
- Match each coloured wire to the appropriate terminal on the jacks as shown in the diagrams.
- Ensure that no copper wire is touching any exposed metal inside the jack or electrical box.
- Ensure that all connections are secure.
- Place the jack cover over the casing and either snap or screw it into place.
At the NID/Demarcation point:
- Strip the wire sheath and coloured wires the same way you did for the jacks.
- Connect the wires that come from each jack location to the entry wiring at the demarcation point. Be sure to match the colours correctly.
Checking the work:
- If you have arranged for Bell Aliant to provide service at your location, you can now plug a telephone set into any of the jacks, hear dial tone and make calls.
- Check each jack with a telephone set to ensure you can hear dial tone.
Additional Information:
- Bell Aliant will help. Bell Aliant Repair Service can advise you of the charges for a visit by a Bell Aliant technician. Just call 611.
- Ensure that technicians are qualified. Bell Aliant technicians are trained and knowledgeable.
- Contact your city/town planning department to ensure any local codes are followed.
- Please call Bell Aliant at 611 if you require additional information on single line inside wire.
- If you require additional information on wiring standards, you can order the publication Residential Wiring for Telecommunications (T525 94) from the Canadian Standards Association or visit www.csa.ca.